Corporate administrators can enroll the employer’s verification locations in E-Verify through the corporate administrator account.
To enroll a verification location, the corporate administrator must provide the information for that location in E-Verify. Although, a corporate administrator account does not require an MOU, an MOU must be electronically signed for each verification location that is enrolled in E-Verify.
If a verification location no longer needs an E-Verify account, a corporate administrator or program administrator must terminate that account. To terminate a verification location’s account, see Terminate Company Participation – Process Overview in Section 2.6
To enroll a new verification location in E-Verify, follow the steps in Enroll Verification Location-Process Overview.
ENROLL VERIFICATION LOCATION – PROCESS OVERVIEW
Enter Company Information
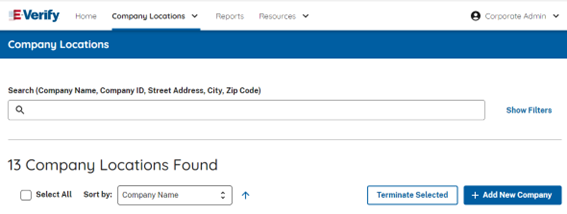
- From Company Locations, select Manage Company Locations.

- The Search Company function may automatically populate some of the company’s information for the new company location.
To search for the company’s information:
- From the Company Information screen, enter the Company Name, Company ID, Street Address, City, and ZIP Code.
- Select the appropriate company and click View Company Profile.
- If the company information is auto-populated, review the information for accuracy and enter the information for any fields that could not be populated.
- To enter the company information manually click Add New Company.
- Enter the information including company name, Employer Identification Number, total number of employees, physical address and mailing address.
Select Employer Category
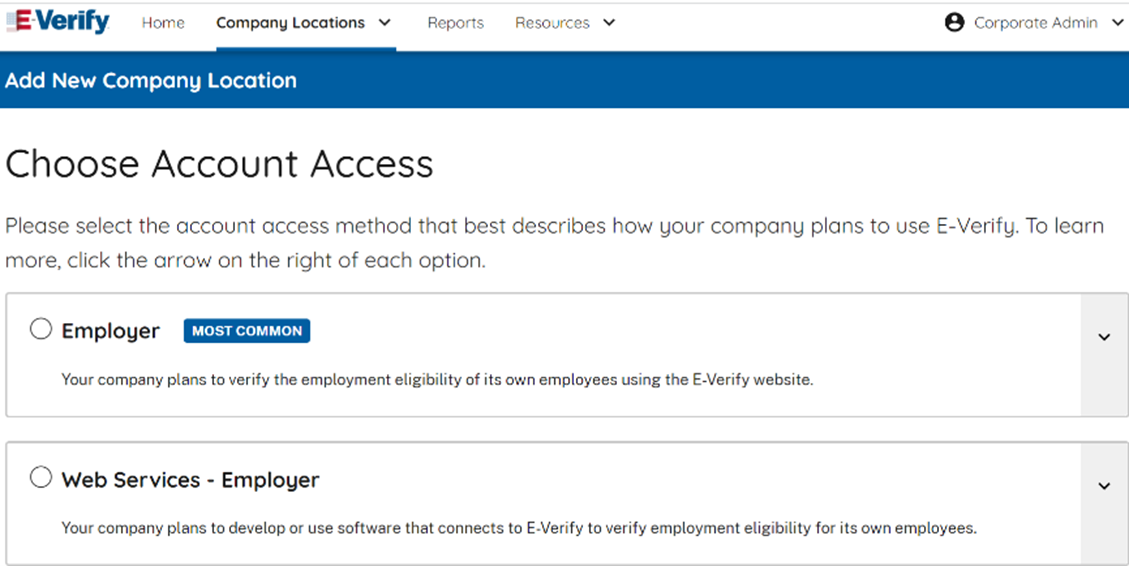
Choose Account Access
- Select the account access method that best describes how your company plans to use E-Verify.
- From the Add New Company Location screen, select the account access method that best describes how your company or entity plans to use E-Verify and click Next.
Employer Category
- To ensure we provide you with the right information you need to use E-Verify, please select the employer category that best describes your organization. Click on Next.
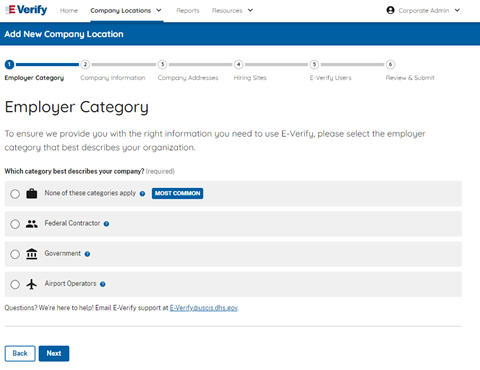
IMPORTANT: If you indicate Federal Contractor with FAR E-Verify Clause, you will be required to select the federal contractor category that best describes the organization and indicate who will be verified. For additional information, refer to the E-Verify Supplemental Guide for Federal Contractors.
2. Company Information
From the Company Information screen, enter the company information including the company name, doing business as (DBA), employer identification number (EIN), unique entity identifier (UEI), data universal numbering system (DUNS), total number of employees, North American Industry Classification System (NAICS) code, and click Next.
To determine the NAICS code, select the appropriate sector and subsector by clicking the look up a code. The resulting NAICS code will appear.


- Click Next
3. Enter Company Address
Enter the company’s physical address and mailing address information.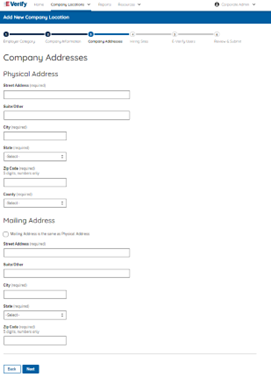
- Click Next
4. Hiring Sites
A hiring site is the location where employees are hired and complete Forms I-9. Employers select which hiring sites participate in E-Verify and must verify all newly hired employees for that hiring site. If you decide not to have a hiring site participate, you are not permitted to create E-Verify cases for your employees at that location.
Click Bulk Upload or Add Hiring Site.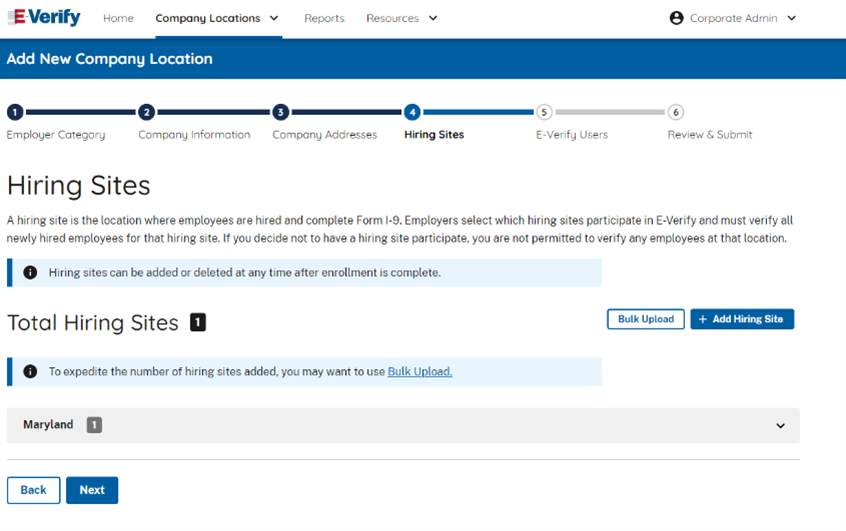
From the hiring sites screen, select Add Hiring Site and enter the street address, city, state, and ZIP code and click Add Hiring Site to add your hiring sites one at a time.
To add multiple hiring sites, follow the steps outlined in the following Bulk Upload of Hiring Sites – Process Overview.
Bulk Upload of Hiring Sites
The bulk upload function allows you to add multiple hiring sites by uploading a file. To use the bulk upload function, you must create a comma separated value (.csv) file with the hiring site addresses.
BULK UPLOAD OF HIRING SITES – PROCESS OVERVIEW
- From the Hiring Site tab, select Bulk Upload.
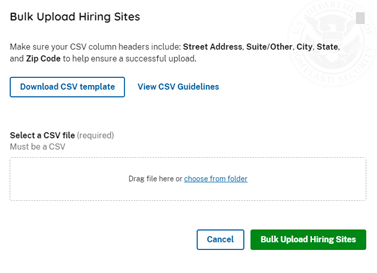
To help you prepare a spreadsheet to bulk upload large amounts of hiring sites’ data into E-Verify, click View CSV Guidelines.
- If you encounter errors, click Export Errors from the highlighted error banner displayed under Total Hiring Sites.
- Correct export errors, save the file, and click Bulk Upload to upload the document again.
- Click Bulk Upload Hiring Sites to complete the bulk upload process for hiring sites.
5. E-Verify Users
A company must have one Memorandum of Understanding (MOU) Signatory and at least one program administrator.
- The MOU Signatory must have authority to sign the MOU on behalf of your company and will be added as the point of contact on the E-Verify account. The MOU signatory can also be registered as a program administrator.
- Program Administrators can create and manage cases and user accounts, run reports, update account information, and unlock passwords for other user accounts.
Sharing accounts is prohibited; all users must have their own individual user accounts.
If you will need access to E-Verify once your company or entity is enrolled, please add yourself as a program administrator. We will provide you with a new user ID.
Add user(s) below and designate which user is the MOU signatory and which are program administrators.
You must add user(s) so your company or entity has one MOU signatory and at least one program administrator. You can add additional program administrators at any time after enrollment is complete.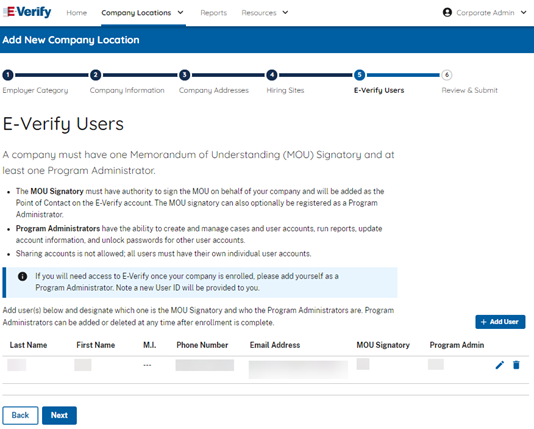
Add E-Verify user information.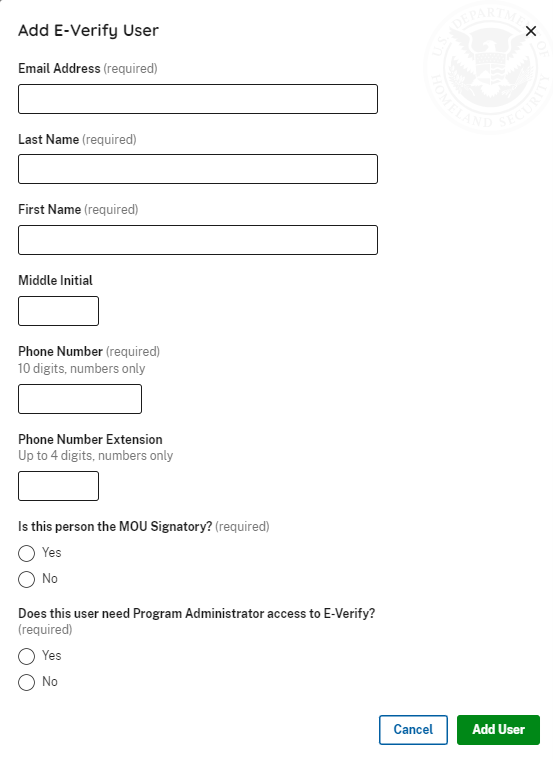
Click Add User
Click Next
6. Review and Submit Enrollment
Review the enrollment agreement. Click on I Agree to Term of Use box.
Click the Submit Enrollment button.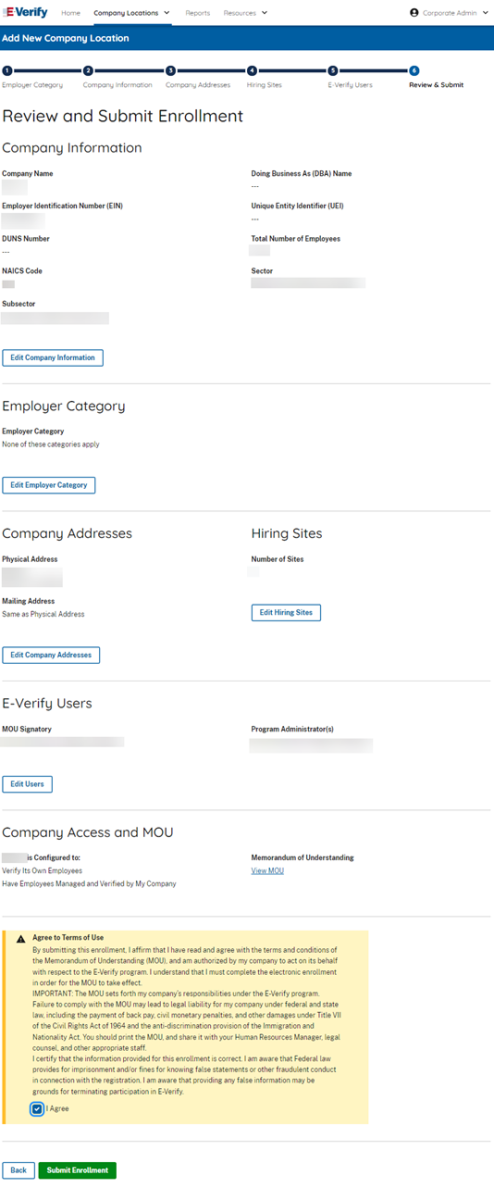
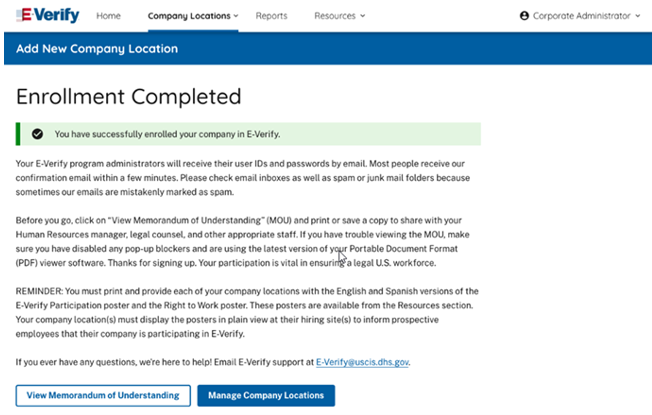
From the Enrollment Completed screen click View Memorandum of Understanding to view the MOU or click Manage Company Locations to return to your search page.